Hey guys, are you looking for How to Defrag Windows 8.1? If you are facing a slow system issue due to fragmentation of your hard disk, then you have landed to the right place to resolve the issue of defragmenting Windows 8.1 or Win 10. Here, we have provided multiple solutions to keep your system light to perform the tasks faster.
Don’t confuse with the terms ‘windows 8.1 defragmentation’, ‘Optimize Drives’, ‘defrag Windows 8.1’, ‘Windows Disk Optimization’ and more, because these all are the same thing. As a layman, the terms can be understood as, keep your system optimized by stopping the background applications which are not required to run for a time being.
What is Windows 8.1 Defragmentation?

When you switch on your laptop or computer, the device used too many resources to start your system smoothly with the help of running background applications. And due to performing multiple backend software at a time, your system may go slow down to perform and hence you need to defrag your disk. Below are the solutions which will help you to optimize your drives by defragging it.
Method 1: Hard Drive Optimization in Windows 8.1
- Open Control Panel by pressing Win+X+R keys together
- Now navigate to the ‘View by:’ option given at the top right or the screen
- Arrange view by option with Large Icons or Small Icons.
- Here you will get the Administrative Tools option, Click on it.
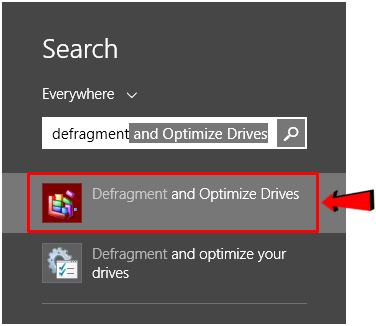
- In the next window, you can see the list of files is there. You need to double-tap on Defragment and Optimize Drives.

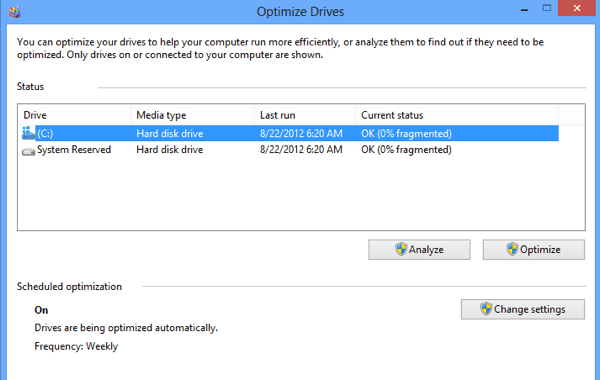
- In the next opened panel, select all the drives and click on Analyse all.
- If you see, any of the drive having more than 20% fragmented status, select that and click on Optimize Repeat it for all the drives having more than 20% fragmentation. You can also select multiple files at a time followed by Ctrl button.

- After finishing the process, restart your system and experience the smooth-running device.
NOTE: During the process of windows 8.1 defragmentation, you don’t need to keep your PC idle. You can perform your normal tasks meanwhile.
Pro tips to keep in mind
Never try to defrag your USB or other external storage device using this method because they have a limited number of reading and writing capabilities. If you will try to defrag them, there are higher chanced to decrease its total lifespan.
Method 2: Use Command Prompt to Defrag Windows 8.1
- Press Win+X+A keys together to open Command Prompt window with administrator privilege.
- Now enter the command DEFRAG <volumes> | /C| /E <volumes> [<task(s)>] [/H] [/M | [/U] [/V]]
- Wait to finish the process automatically and then restart your computer.
Method 3: Set Indexing Options for Windows 8.1 Defragmentation
- Press Win+X keys to open start menu
- Now press P or select Control Panel from the list.
- Now arrange the View by option with large or small icons
- Find and click on Indexing Options
- In the next step, you need to click on Modify given at the left-bottom side of the active window
- Now select the check-boxes which you want to search and then press the OK
Method 4: Disable Windows Search Option
- Open Control Panel by pressing Win+X+P keys at a time
- Now search for Service
- Click on ‘View local services’ given under ‘Administrative Tool’
- Now find the HomeGroup Listenerand HomeGroup Provider
- Right-click on each one-by-one and then select to Stop if it’s running already
Method 5: Stop SuperFetch File to Defrag Windows 8.1
- Press Win+R keys to open the Run box
- Now type msc
- You can see a new window is opened. Look for the Superfetch file
- Right-click on it and choose the properties option
- Now navigate to Startup type section and select Disabled from the drop-down menu.
- After selecting the option, click on Apply and then press on the OK button to save the changes
Method 6: Disable Real-time Windows Defender Protection
- Open Control Panel by pressing Win+X+P keys
- Now search for Windows Defender and open the option from the result.
- Now go to the Settings tab given under Windows Defender window.
- Uncheck the box of ‘Turn on real-time protection (recommended)’ and then click on Save changes.
Method 7: Uninstall the Unused Software
- Open Control Panel
- Click on Uninstall a program given under Programs section
- Now click on Size column to organise the files in ascending or descending order
- Choose the software which is higher in size but you are not using it for a long time.
- Right-click after selecting a file and then choose to uninstall the program
- Repeat the process for all the software which you don’t want to use but it’s taking unnecessary space in your system. This process can help to defrag windows 8.1 and optimize your hard drive
Method 8: Windows 8.1 Defragmentation using Task Manager
- Right-click on blank space in the toolbar
- Click on Task Manager from the list
- Go inside the Processes tab
- Click on Memory column to sort it by descending order
- Now select the programs which you are not using now but utilising larger memory
- Right-click on it and choose to End Task
- Repeat the process for all the applications which are not required for now by running in the background.
Note: You can also end the tasks for those applications which are idle but occupying higher CPU and disks space.
Final thoughts
We hope these methods will help you to defrag Windows 8.1 or Windows 10 by following one or more of the solutions given above. We would love to know; which methods did work for you. Please share your experience in the comment box given below and stay tuned to this blog for more updates of technical issues.
Leave a Reply