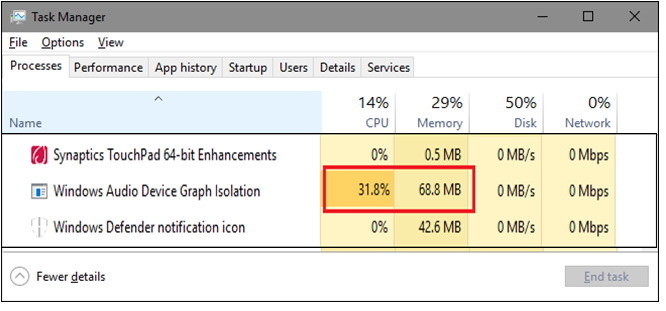
Let’s see what is windows audio device graph isolation and how can we fix the high CPU usage at the same time. Knowingly or unknowingly, there are too many applications run in our PC. As it runs in the background, it eats up too much space of memory and CPU. To overcome the problem, either we disable a few applications from Task manager or we uninstall it from the computer.
But there is another program namely “Windows Audio Device Graph Isolation” which keeps running in the background and slows down the overall computer performance.
What is Windows Audio Device Graph Isolation?

Audio Device Graph Isolation is an embedded application comes in Windows OS with the file name of AudioDG.exe. The utility works as the sound engine for all the inbuilt and third-party applications. Due to such a program, you can listen to music, system open and shut down sounds, mouse clicks, and many more.
Why Does It Consume Windows System’s Memory?
When your audio device is in idle mode, it consumes around 8MB of memory and almost 0% of CPU and Disk. But once you run any music, multimedia, or other sound-based files, the CPU usable by audio graph immediately increased. But still, it doesn’t consume too many resources. However, if you are running multiple audio-based files at a time then it will start accessing too many resources.
In such a condition, either you can disable the application or try to close the several opened files or applications.
Is Audio Device Graph Isolation a virus?
You can confirm your doubt after checking the official application path. If the audio graph isolation application is placed in the below-given address with the proper file name, that means, it’s not a virus.
- Right-click on the taskbar and tap on Task Manager
- Under the Processes tab, scroll down or shortlist the application by name and reach to Windows Audio Device Graph Isolation and then select to Open File Location followed by right-click feature.
- If it lands inside This PC> C:\Windows\System32 that means, the application is not a virus but a real file placed by the Windows itself.
Can I disable this option?
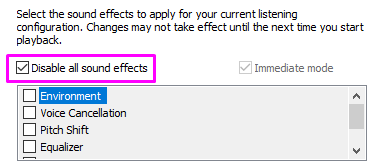
Yes, but only if you want to disable all the sound effects in your laptop or computer. Otherwise, it is unnecessary to mute all the sound effects in your system to fix the problem “Windows audio device graph isolation high CPU usage”.
Alternatively, you can disable it for a while and then restart the process by following the reverse steps to enable again after finishing your important task.
How to fix Windows Audio Device Graph Isolation High CPU Usage?

Method 1: Disable every Sound Effects in your computer
- Go to the search bar by pressing Win+S keys together and enter the Control Panel.
- Now go inside the Control Panel and short the View by option by Large Icons.
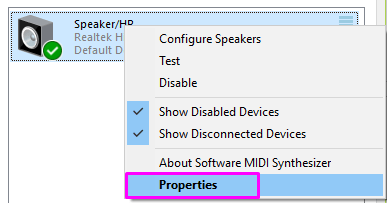
- Further, navigate to Sounds, select the available options and right-click to open the Properties

- Here, you need to navigate inside the Enhancement tab and select all those options which you want to disable.
![]()
- Finally, click to apply all the changes to save the settings.

- If you see another device inside the sound section, you can process the same steps to disable all the required applications and then restart your PC.
Method 2: Update Audio Drivers
- Open the Device Manager by pressing Win+X keys together and then choose the option from the list. Else, you can open the same by entering msc in the Run box followed by Win+R keys at a time.
- Navigate to Sound, video and game controllers and click on the small arrow key to expand the section.
- Following the right-click option, you need to choose to Update Driver.
- You will see two options there, and you need to choose the one stating “Search automatically for updated driver software”.
- Follow the same process to update all the listed audio applications.
- Once Windows will find the targeted update, it will complete the task automatically.
- After completing the process, you should restart the PC to apply all the updates.
Check here: How to Update Drivers in Windows 10
Method 3: Use Antivirus to Full Scan Your Computer
Another method to fix the Windows audio device graph isolation issue is to scan your PC with antivirus.
The perform the task, either you can download and install any third-party anti-virus or you can use the best-inbuilt antivirus that comes with your Windows. Yes, Windows defender is the best virus scanner which can fix such audio device graph isolation problem just by scanning your C drive completely.
- Navigate to search bar and look for Virus & Threat Protection application in your computer. Windows 10 have an inbuilt virus scanning tool which can give you full protection from the untrusted application.
- Once the virus & threat protection panel opens, now click on Scan Options.
- Further, choose the second option i.e. Full Scan and then hit the Scan Now
- Now wait for some time to complete the process and then restart your PC to see the changes.
Note: Don’t get confused between the terms “Virus & Threat Protection” and “Windows Defender” because both are the same things which work to protect your system from virus, malware and ran somewhere attacks.
Method 4: Check with Skype
To fix the problem regarding Windows audio device graph isolation high CPU usage, some users also claim that Skype is the culprit.
If in case, you didn’t get the solution yet then you can also try to fix the audio device isolation issue by uninstalling and reinstalling the Skype messenger. You can either uninstall the Skype from the Control Panel or you can follow the below-given steps.
- Press Win+I keys at a time to open the Windows 10 settings panel.
- Navigate to App section and then scroll down till you get the Skype option.
- Now click on the Skype and hit the uninstall button and confirm the choice after verifying on the small pop-up window.
Conclusion
Hope the above-given solutions to fix the Windows audio device graph isolation problem will be helpful to you. Let us know in the comment section below that which method was more useful to fix it in your PC.
Leave a Reply