If you don’t require a Microsoft defender anymore and want to turn it off, We will show you how to disable windows defender in this guide. Windows defender is nothing but an anti-spyware that safeguard your systems from unwanted software. It is designed in such a way that protects your computer, laptops, or systems from viruses and other malware.
Here are the top 7 Methods explained about Turn Off Windows Defender permanently or temporarily.
Top 7 Methods To Disable Windows Defender In Windows 10
Mainly six methods will guide you to know how you can disable windows defender in the windows 10 operating system.
1] Using the Group Policy Method
If you want to disable your Microsoft defender from your network, then group policy works better.
Here is the point on how to disable windows defender using group policy. Follow the step wisely and do not skip any of the steps.
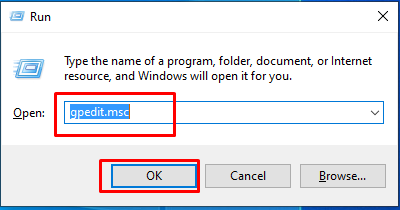
- Go to the Run windows by pressing Win+R keys and enter gpedit.msc to open the Local group policy editor.
- Open Computer Configuration then go to Administrative Templates and further go inside Windows Component.
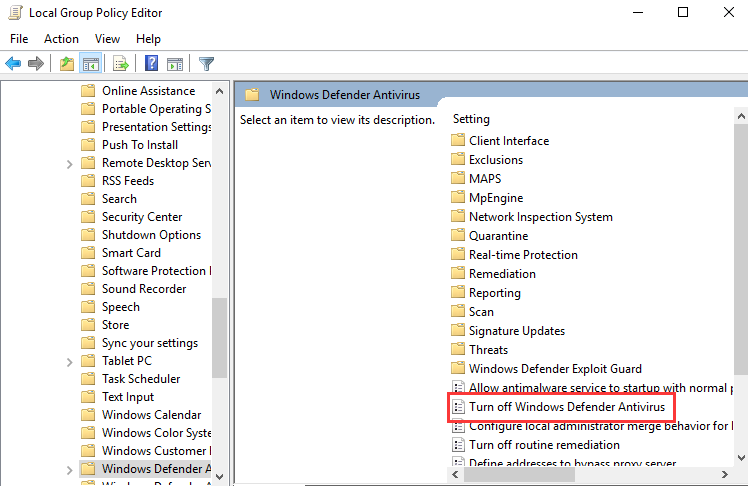
- Now select the Windows Defender Antivirus and navigate to the right-hand side and click on turn off button.
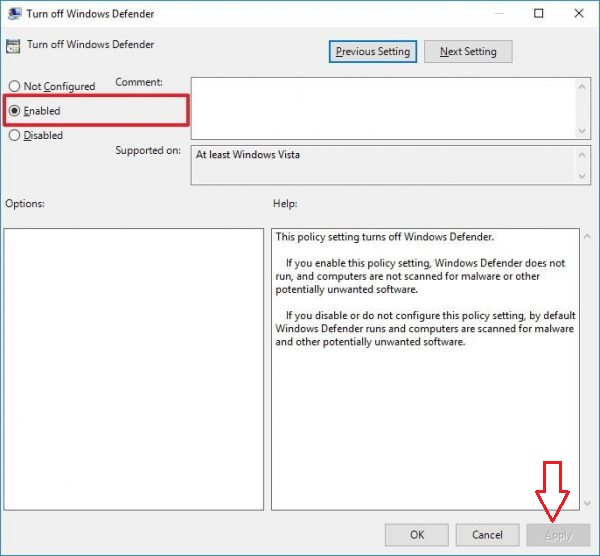
- The final step is to select the Enable option.
This setting can be done from local group policy as well as from domain group policy.
2] Using Windows Registry
Using the Windows registry method, you can easily Turn Off Windows Defender. Using windows registry, you can even disable the Microsoft defender permanently by just making some registry key.
Follow the steps of method windows registry wisely to permanently disable your windows defender.
- By opening the Run -> Regedit, it will open the windows registry editor.
- Now follow the further location very carefully.
HKEY_LOCAL_MACHINE\SOFTWARE\Policies\Microsoft\Windows Defender
- Once the Navigation of keys has been done successfully, in the right pane click right the empty area.
- After clicking the empty area, you create a new DWORD (32-bit) value.
- Change the name of the new item to
- Now the final step is to double click on DisableAntiSpyware and change its value to 1.
Remember that, windows defender might not load until you restart your system again.
Also Check: How to Turn Off Windows 10 Update
3] Turn Off Windows Defender Using the PowerShell Method
There is one benefit of using PowerShell to disable your windows defender is you can easily deploy the alterations to Microsoft defender on several systems or computers across different networks.
Follow all the steps wisely if you prefer using the PowerShell method to disable windows defender.
- Run PowerShell with administrative privileges(Windows key + X + A)
- Perform the command to disable the real-time monitoring of Microsoft defender.
Set-MpPreference -DisableRealtimeMonitoring $true
- Perform the following command to enable real-time monitoring.
Set-MpPreference -DisableRealtimeMonitoring $false
4] Command Prompt Method
The command prompt method is the temporary method to disable the windows defender. The system will return to its original state once you restart the system again. There is also some method where you can permanently turn off windows defender from your system.
- Go to the command prompt with administrative privileges
- Perform the following command to disable the windows defender
sc stop WinDefend
- And again, to enable the windows defender to run the following command
sc start WinDefend
5] Using Windows Setting Methods
If you are looking to turn on or off your windows defender you should take note of the following steps.
- Go to Windows Settings by pressing Windows key + I keys at a time.
- Once it has been done, go to Update & Security –> Windows Security.
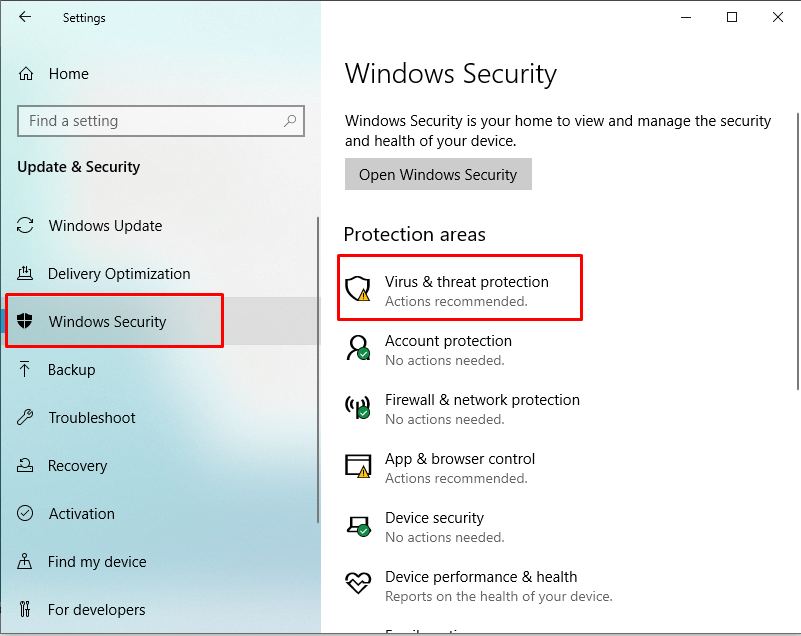
- select Manage settings under Virus & threat protection settings, from the right-hand pane
- Toggle the switch to Off under Real-time protection
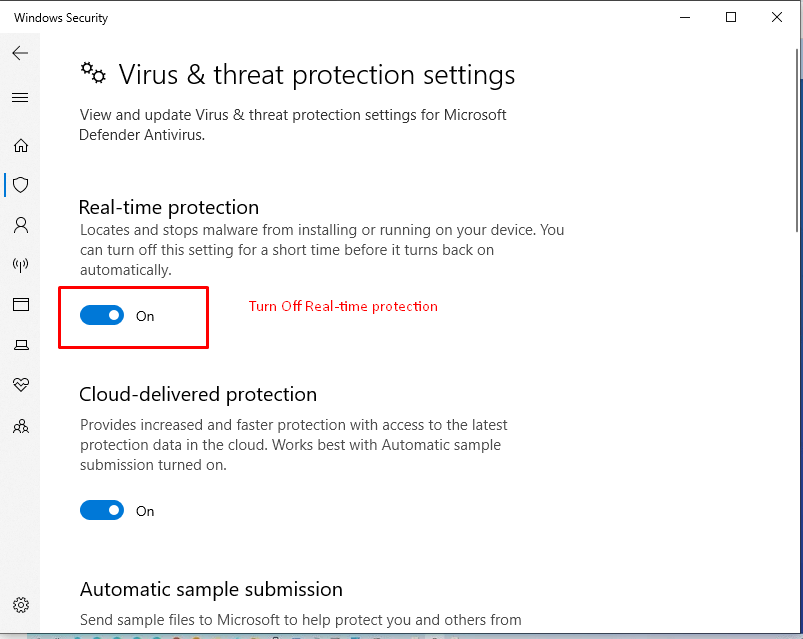
This will disable the real-time protection but the manual scan will be available to you.
6] Using Windows Setting Method
If you want to turn off windows defender using the windows setting method, then follow the steps.
- Click the Start button and type Defender inside. Further, select the Windows Defender
- In the “Windows Defender” panel, click the “Settings” button at the top right of the window and there you will see the “Settings window”.
- Further, go to Settings > Update & Security > Windows Defender and click the “Add an exclusion”
- Finally, click the “Exclude a Folder” option and then select your C drive or the drive where you have installed operating system.
7] Disable Windows Defender Permanently
- Open the Task Manager on your computer and then try to find the running windows defender service.
- Search the name Antimalware Service Executable and the service windows Defender Antivirus Service.
- Right-click on the Windows Defender Antivirus Service after that click on the Stop button.
- If you see an error appear on the screen stating that the Operation could not be completed then start the App Services and click right on windows Defender Antivirus Service.
- If you will be able to see the following choices are disabled: Start, Stop, Pause, Resume, Restart that means the defender is permanently disabled.
How to Verify Windows Defender has been Turned off Successfully After Restart?
It is important to check after you disable windows defender, it has been turned off successfully.
Here are the steps on how to check that your windows defender has been disabled successfully.
- First, you need to restart your PC and then go to Task Manager.
- Now, start Windows Security, take a look at Virus & threat protection. The spinning icon will appear and the unknown status will show you. The reason behind that is, it’s fetching the information.
- Wait for 2 to 3 minutes and you will able to see Virus & threat protection is disabled.
Why do You Need to Disable Windows Defender?
Why would anyone want to Turn Off Windows Defender even though it’s a free anti-virus which protects your computer or laptop from unwanted software and malware?
Windows defender doesn’t treat well enough different applications and programs. It treats them as a threat and it won’t allow them to get it installed easily. It doesn’t allow any other small application to get installed in your system.
Sometimes it does warn you from installing some application that might be a genuine purpose. The intention of windows defender is very clear that it won’t allow you to install any unwanted software or application which might harm your system. But sometimes we don’t take that seriously and install the app anyway.
In some case, you know that the software or application is not harmful and it will not damage my system, but even though the windows defender won’t allow you to do that. Now, that is where the main problem arises and people want to turn off windows defender.
Conclusion
The article is for the people who struggle to Disable Windows Defender. You will find multiple methods in this article on how to turn off windows defender.
We would love to hear back from you, what method you liked the most and will appreciate your feedback as well. Drop your thoughts in the comment section below and let us know how useful you find this article. Keep visiting our sites for more hacks and tips related to technology.
Leave a Reply