There may be a different need of an individual to change username on Windows 10 and we know, you also want to personalize your PC and so you have landed here with a hope to know the steps of how to change account name on windows 10. Everyone loves to see some personal touch on their device. And changing the user name and profile icon is one of the most used features on a Windows laptop.
So stay here and read the complete article to know the multiple ways of Windows 10 change username. Let’s begin with the solutions for changing username in your Windows laptop or desktop.
4 Ways to Change Username on Windows 10

The Microsoft account through which a user logs in to Windows 10, has a username that is chosen by the user. It is easy for an individual to change the account name in Windows with admin access.
The best 4 ways to change the username in Windows 10 are here:
1] Change Username on Windows 10 Via Control Panel
Using the Control Panel is the easiest way to change Windows 10 account name. Follow the easy steps to customize the same:
- Press Windows + R Key at a time to open the Run dialogue box.
- Type control userpasswords2 and then press Enter key.

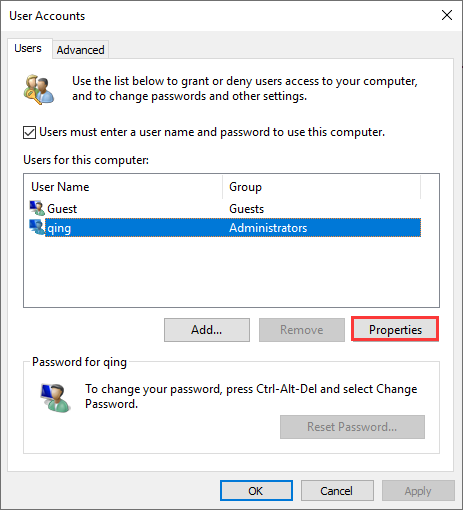
- In the next step, you will see the User Accounts are opened.

- You need to double click on the account option to change its username, or you can also select the Properties

- Here, you can assign the username of your choice.
2] Change Account Name in Windows 10 From Local Users and Groups
Follow the steps to Run Local Users and Groups to change the account name in Win 10:
- Press Windows +R Keys to launch a Run dialogue box.
- Now enter lusrmgr.msc and hit the OK button.

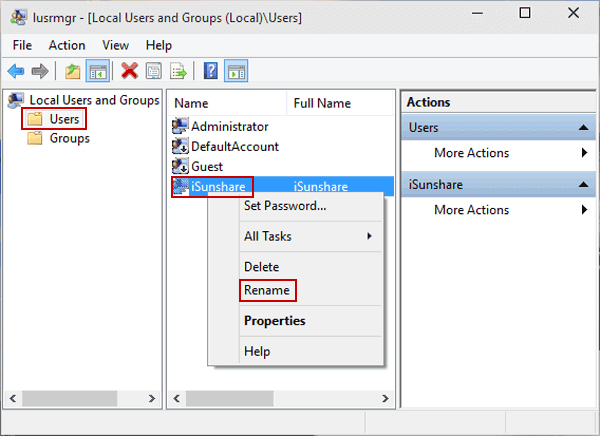
- Once the panel opened, select the Users folder
- Right-click on the selected folder and the choose to Rename.

- Here, you need to type the username of the account you want to change for.
- After providing the needful details, Hit the OK button to save the changes.
Also Check: How To Reset Windows 10 Password
3] Change Administrator Name in Local Group Policy Editor
Policy Edit folder will help you to change Windows 10 username by following the steps below:
- Press Windows key to open a search bar
- Now type Run and then click the same option from the result.
- Here, in the Run box, you need to type gpedit.msc and hit the Enter key.

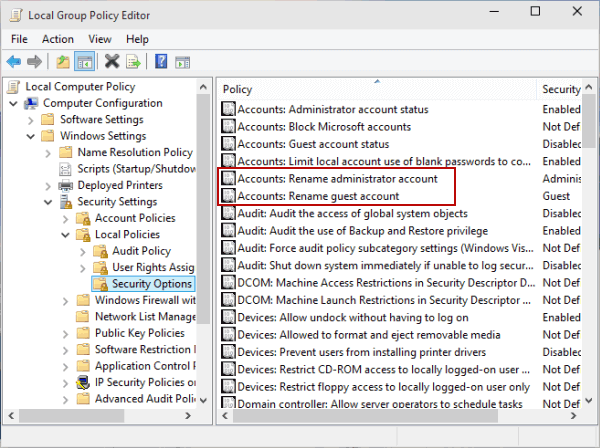
- Once it is opened, Select Computer Configuration
- After landing to the internal window, navigate to these subfolders: Windows Settings > Security Settings > Local Policies > Security Options > Accounts: Rename administrator account (or Accounts: Rename guest account).

- Rename the username as per your preferences and then press Enter key to apply the changes.
4] Change Your User Account Name on Windows PC From Settings
If you don’t want to go with the above-mentioned steps, you can follow this method to change your Windows 10 username via settings:
- Press Windows +X Keys from keyboard to open the quick access menu.
- Choose Settings from the given options. If you can’t see the option in the list, simply press Win key and search there for Settings. However, you can also access the panel by using a short key Win+I
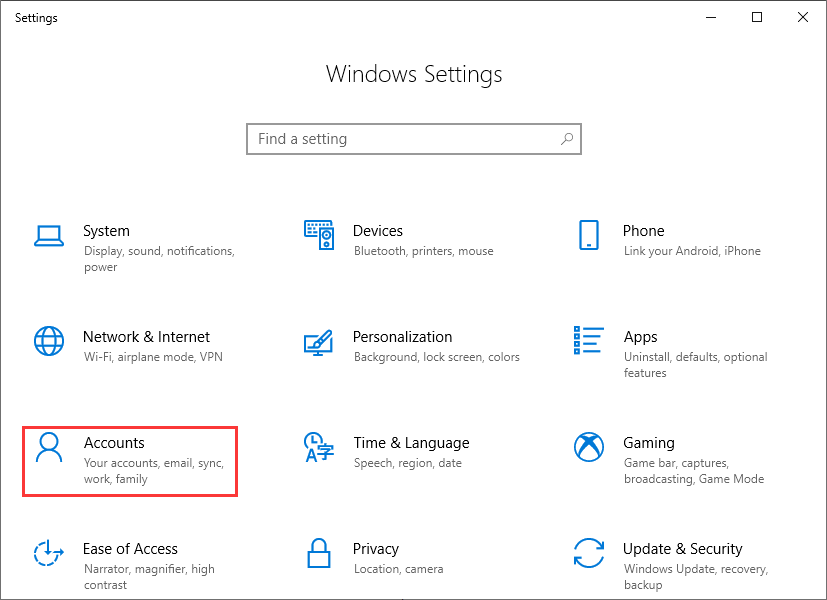
- In the panel, click on the Accounts option and select Manage my Microsoft Account.

- Click on the drop-down menu under the Microsoft account.
- Here, select Edit Profile and click on the Edit Name
- Now, type the username you want to change followed by a verification characters if it required
- After making the changes, click on the Save button to apply the changes quickly.
Conclusion:
Many users search on Google for “Windows 10 change username”. So above, we listed the top 4 best and easiest way to change username on windows 10 computer. We would love to know, which is your most favorite methods to rename your user name on Windows PC? Please write your experience in the comment box and also share if you know any other simplest way to change the account name.
Leave a Reply